What is a relay?
Relays are a type of switch that can be turned on and off electronically. Internally they are actually made up of two physically and electrically separated circuits:
the input circuit, which does the switching, and the control circuit, which is what gets turned on and off.
Relays can also do more than just connect or disconnect a single path of electricity: they come with different combinations of 'Poles' and 'Throws' which enable you to do interesting things
when the input circuit is or is not activated - such as toggle between devices, or even completely invert the polarity or an entire circuit!
A short-circuit, a low-resistance connection forms between two points in an electric circuit. As a result, the current tends to flow through this newly formed connection rather
than along the intended path. For example, if there is a direct connection between the battery’s negative and positive terminal, the current will flow through it rather than passing through the circuit.
In a short circuit current can flow at dangerously high levels that can damage electronic equipment and even cause explosions in some cases.
Poles
 The number of Poles a Relay has defines how many switches there are in its control circuit.
A Single Pole Relay has one switch, and a Double Pole has two switches.
A Single Pole will let you switch only one device on/off, but a Double Pole will let you switch two devices on/off simultaneously.
Note that Poles cannot be controlled independently, they are both controlled by the same single input signal.
The number of Poles a Relay has defines how many switches there are in its control circuit.
A Single Pole Relay has one switch, and a Double Pole has two switches.
A Single Pole will let you switch only one device on/off, but a Double Pole will let you switch two devices on/off simultaneously.
Note that Poles cannot be controlled independently, they are both controlled by the same single input signal.
Throw
The number of Throws a Relay has (or more specifically a Pole has) defines how many output contacts each Pole in the Relay can switch between.
A Single Throw has one output contact per Pole, and a Double Throw has two output contacts per Pole.
A Single Throw can only switch its single contact from on to off and back again, whereas a Double Throw will alternate between its two contacts when the Relay is on or off. When Contact A is turned off, Contact B gets turned on, and when Contact A gets turned back on, Contact B gets turned back off.
Pole/Throw Combinations
We combine the Poles and Throws of a Relay together to define its Pole and Throw configuration, such as:
- Single Pole Single Throw - SPST for short
- Single Pole Double Throw - SPDT
- Double Pole Single Throw - DPST
- Double Pole Double Throw - DPDT
The contacts on a Double Throw Relay on a Double Throw Relay use the following terminology to describe the function of the contact:
Normally Open (or 'NO') - When the Relay is not powered or not activated, this side of the control switch is an Open Circuit with the Common Contact
A device connected to this contact will be OFF by default.
Normally Closed (or 'NC') - When the Relay is not powered or not activated, this side of the control switch is a Closed Circuit with the Common Contact.
A device connected to this contact will be ON by default.
Common (or 'C') - When the Relay is not powered or not activated, the NC contact is connected to this contact. When the Relay is activated the NO contact is connected to this contact.
Input Power
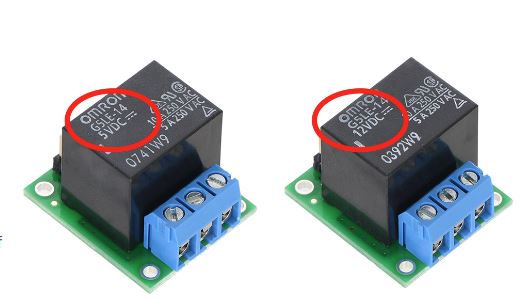 First, we need to consider what input voltage the Relay requires to be activated and if your circuit can provide the required voltage to it.
Most DC Relays available to makers come as either 5V or 12V input voltages.
Most DC Relays available to makers come as either 5V or 12V input voltages.
If you are using a 5V or 3.3V microcontroller, such as an Arduino or Raspberry Pi Pico, you will have an easier time working with a 5V Relay
Furthermore, if you are using a 3.3V microcontroller, you must check that your relay is compatible with 3.3V power and logic using the datasheet.
Input Circuit
 How to connect the Relay to the Raspberry Pi Pico.Connect the following 3 pins of the Relay Module to the corresponding pins on the Pico:
Relay VCC -> Pico 3V3V
Relay VCC -> Pico 3V3V
Relay IN -> Pico GPIO 16
Switching an LED
Plug the Pico into your computer, open up Thonny and copy-paste the following code into a new script:
Normally Open
The circuit from the previous example has the is connected to the Normally Open terminal of the Relay, which means by default the Fan will be OFF.
Create a new file in Thonny and copy-paste the following script:
Normally Closed
Now let's see Normally Closed. Leave the Pico disconnected, disconnect the 12V power source, and move the wire connected to the Normally Open terminal of the Relay to the Normally Closed terminal.
Now reconnect the 12V power source - you will see the fan immediately turn on, even with the Pico completely powered off and not running! Normally Closed is ON by default.
Reconnect the USB Cable to your Pico, and run the script again - you should see the fan turn OFF as the Relay activates and moves the Control Circuit across
to the Normally Open terminal (which now has nothing connected). Pull the USB cable out from the Pico again, and the Fan turns back on!